
Self-tapes gained popularity as a pandemic solution, when in-person auditions were not an option due to COVID-19 restrictions. But thanks to their digital nature – which vastly increased the number of actors able to audition for roles – they have become the norm and revolutionised the casting process for film and TV. Self-tapes are commonly used for the first round of auditions, and many roles, particularly small and supporting ones, are now cast off tapes alone.
Whether you’re new to the industry or a seasoned pro, it’s vital to know how to film and edit a good self-tape. Here’s a breakdown of the equipment you need, the best practices to adopt, and tips and tricks from BAFTA Breakthrough 2024 casting director Harry Gilbert (G’wed, Reawakening) on how to smash your taped auditions.
JUMP TO
A self-tape is a video, typically recorded at home by the actor, in which you perform scenes or monologues assigned by the casting director. They act in lieu of an in-person audition, but serve the same purpose, with actors sending their footage to the casting director for evaluation.
Thanks to their digital nature, self-tapes allow actors to not waste time travelling or forking out financially to attend the overly saturated market of first auditions. They also allow casting directors to observe the work of a greater number – as well as a wider range – of actors. While turnaround times can be quick, self-tapes still afford actors greater flexibility with when they hit record, and allow them to participate in casting calls from different regions or countries.
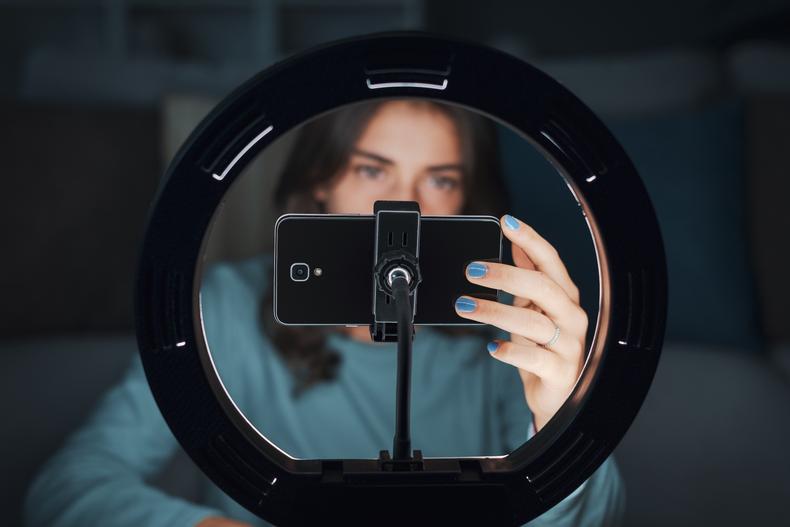
Stock-Asso/Shutterstock
The first thing to think about when it comes to filming a great audition tape at home is your equipment, and there are five must-haves when it comes to self-taping:
1. A video camera: A high-quality camera is essential to capturing your performance. There’s no need to rush out and buy an expensive DSLR (digital single-lens reflex) camera, though — most modern smartphones are able to record high-quality video footage that often rivals, and in some cases even surpasses, entry-level cameras. However, it is worth checking your device’s settings to make sure you’re filming in high resolution (at least 1080p), because blurry or grainy footage can distract from your acting.
2. A microphone: Clear audio is just as important as video quality, and though your smartphone’s built-in mic is sure to be adequate, investing in a simple clip-on lavalier mic or a directional microphone can significantly elevate the audio quality of your tape. It’ll ensure the casting director can hear your lines, and give you a more professional result.
3. A tripod: A still, stable recording is key to a successful tape. Attaching your camera to a tripod will keep your framing consistent as well as your camera steady and at eye level. Tripods also travel well, making it easier to film self-tapes on the move. There are plenty of lightweight yet sturdy models available at an affordable cost, so consider investing in one.
4. A backdrop: A plain backdrop, such as a solid coloured wall, flat sheet, or even a photographer’s backdrop and stand, will help you pop and reduce visual distractions. Neutral colours such as blue, grey, or beige are ideal, as they are unlikely to clash with your clothing, wash you out, or overpower your performance. Avoid busy or cluttered backgrounds, as these can take focus away from you and your work.
5. A light source: Ensure your face is well-lit and visible. A natural light source is best, so try to position yourself in front of a window. Juggling last-minute audition tapes and your day job, particularly during the winter months, can mean having to film after dark, so consider buying a simple panel or softbox light, or even this ring light (which doubles as a tripod). These can provide even, flattering lighting when sunshine isn’t an option. Position the light in front of you (rather than overhead or behind) to avoid harsh shadows.
With these five equipment basics, you’ll be able to create a professional self-tape that showcases your talent and allows casting directors to focus on your performance.
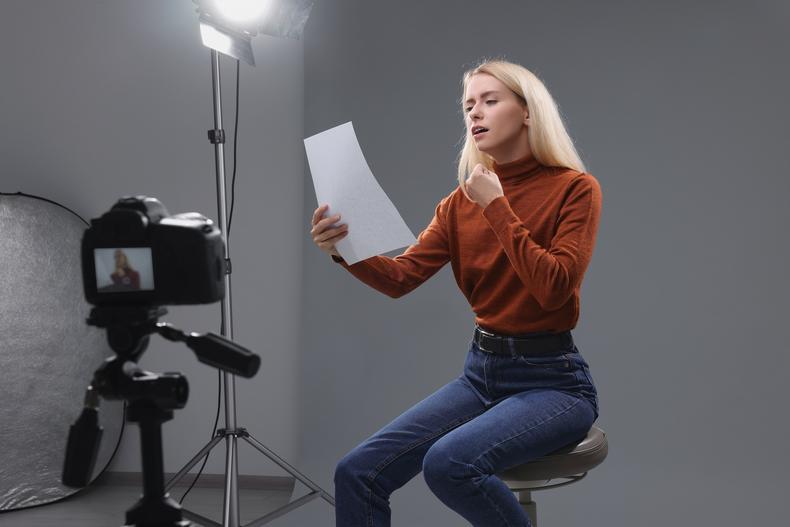
New Africa/Shutterstock
Gilbert gave us his best advice for nailing a solid self-tape, as well as an insight into exactly what casting directors are looking for in your performance.
1. Know your setup: Gilbert stresses that you don’t need to spend loads of money on fancy equipment, but he also points out that “it can be really useful to have a setup which you know works well for you, even at the last minute or when you’re travelling.” So, get to grips with the basics – such as identifying the optimal plain wall and source of natural lighting in your home – before you start taping.
2. Do your homework: As with an in-person audition, it’s important to prepare for the role you’re taping for. Read everything you’ve been given, from character breakdown to details about the production, as well as the script. Gilbert recommends looking at the basics first: “Is it a comedy, is it a drama? Is it a second series of a returning show or something new? Who’s directing it? What information can you gather to tell you more about the tone or style of the piece? What information can you find in the stage directions about where and when this is taking place? Who is this person you’re going to portray?” Once you’ve done that, Gilbert says to think about the finer details: “What do you want, and what are your tactics to achieve that? What’s the journey of the scene? How can you find the changes in thought? If you’ve been asked to tape two different scenes for the same character, then think about what you can find in each scene that showcases the different facets of the character too.” When it comes to being off book, Gilbert says, “Knowing your lines is ideal, but it’s about giving your best performance with the constraints you have. If you only have 24 hours to [submit the] tape, then be comfortable and familiar with the scene so that it flows, but remember it isn’t a memory test. Casting directors are looking for potential, for someone to bring the role alive.”
3. Use a reader: “[It’s] important you have someone to read the other lines in the scene with you, because so much of acting is about listening and reacting,” Gilbert says. Ideally you want someone physically there in the room with you – preferably another actor who knows what they’re doing – though Gilbert adds, “If it’s impossible to have someone in the room with you, then at least have a friend on Zoom [because] someone to react off is so important.” Whomever you read with, Gilbert advises actors to “make sure that you are the focus of the tape, not the person reading in.” They should not appear on camera with you, and you should sound slightly louder on the tape than your reader. If you can’t find someone, then you could use an app such as coldRead to run the lines with you instead.
4. Look the part: Even when auditioning remotely, what you wear is important. Gilbert suggests picking “something neutral or plain that doesn’t distract from the acting.” He adds that “if there is a specific item of clothing that will help you to inhabit the character and their physicality, then wear that – but casting directors aren’t looking for a full costume in tapes.” He also advises actors to “wear minimal makeup unless otherwise specified, or you feel it’s necessary for the character, because you want to make sure the tape looks like you when you turn up for your recall – or the job.”
5. Get your framing and eyeline right: When it comes to filming yourself, there are a couple of things Gilbert tells actors: “Your camera lens should be at eye level and, unless specified, you should always shoot in landscape with a mid to close-up frame – so, your upper chest and head.” He adds that it is important to “pick an eyeline just to the side of the camera lens (either to the left or right)” so that the viewer can clearly see your eyes, but not so close to the lens that it looks like you are looking down it.
6. Follow instructions carefully: “You will always be given specific instructions on what the casting director wants, and it is key to follow the instructions you’ve been given,” stresses Gilbert. “Do not do a slate unless you have been asked for one. Do not send two takes if you have only been asked for one… If they don’t specify on the number of takes, two is generally a good number to submit, but only if you feel there is something different you want to try.”
7. Be confident in your character interpretation: Gilbert’s number-one tip is to “trust your instincts.” “Every actor is going to bring something different, so focus on your take on the role, even if it’s only five lines,” he says. “Who is this person? What has happened to them today? What’s their motivation? Trust yourself, and trust that what you do with the information you have is enough.” He says that sometimes actors worry too much about “getting it right” and what they think the casting director wants. “But all they want to see is your truth in the role, your take, your uniqueness,” he explains.
8. Limit your takes: You may feel pressure to repeat take after take, trying to get the “perfect” one. But don’t spend hours, Gilbert says. Limit yourself to three takes, then watch them back to see whether you’re happy with one or need to make adjustments.
9. Don’t overthink it: Casting directors do not expect you to use lots of props or re-create exactly what’s on the page as if it were a short film. Instead, ”make sure you can be seen and heard, and are framed in a way that means you’re easy to watch,” Gilbert tells us. “What is in your control is your setup, prep, and your interpretation of the character. The rest of it is noise.” Finally, once you’ve submitted your tape, “try to let it go,” Gilbert says. He notes that “casting directors remember good tapes and keep notes on actors who they think are great.” So, even if you don’t get cast this time around, you never know what roles the CD who’s seen your tape will cast next.
Here are five self-tapes where the actors all booked the job they were auditioning for. What do they have in common? They’re well-lit, well-framed, well-filmed, and well-acted.
When editing and submitting your self-tape, begin by thoroughly reviewing the instructions provided by the casting department. Check whether you should edit your takes/scenes into one single file or submit them separately, and act accordingly. There are a number of simple, free apps, such as iMovie or YouCut, which can edit your takes/scenes into one file. Keep it simple with short fade-to-black transitions between each take.
Always submit your files in an MP4 format, unless you have been instructed otherwise, and compress your video files so they are easier to upload/download, and for the casting team to store digitally. Some casting departments will specify a maximum file size, but if they haven’t, rest assured that a two-minute self-tape can usually be compressed to 10MB without losing quality. Various apps also do this, such as Video Compressor for iPhone and VidCompact for Android.
Finally, clearly label your file(s) as specified so that the casting team can keep your submission organised. Clear labelling is sometimes a requirement of the submission process. If you’re unsure of anything, always ask your agent or the casting team to clarify.
If you follow these tips and tricks until they become second nature, you should be able to smash out a decent self-tape quickly and painlessly.